This post is the second part of the “Serverless data processing flow with Kinesis Data Firehose and Terraform” article. In the first part, we design a serverless data analytics flow that processes a continuous data stream. For the demo code, the data emitter is a python script that runs locally, but in a real-world scenario, it can be an application or an IOT device.
Gihub Code For first part : https://github.com/crerem/serverless-kinessis-s3-terraformhttps://github.com/crerem/serverless-kinessis-s3-terraform
GitHub Code for the second part: https://github.com/crerem/serverless-kinessis-redshift-terraform
The data emitter script will send the data to an API Gateway endpoint (read the first part to see why we chose to proxy the Kinessis Data Stream), which will proxy a Kinessis Data Firehose.
The Kinesis Firehose will do the first level of processing and save the data into an S3 Bucket. Then, the flow continues with implementing a Kinesis Data Analytics Application that will transform the data from JSON to CSV, apply “where” conditions, and select only certain essential information (again, see the first part for more details).
With Kinesis data analytics, you can do a second round of processing and live analytics on the input data. The Kinesis application will push the processed data into a second Firehose, storing the data in a final S3.
With the records stored in an S3, our client could do extended analytics using AWS Athena (which is suited for ad-hoc queries where the amount of data is not very large and is in a semistructured format like JSON or CSV ).
However, we needed to expand the infrastructure since we extended the number of data types collected, and the amount of data increased over time. Since the bottleneck was on AWS Athena(too slow for a considerable volume of data and complex query), we introduced an AWS Redshift cluster.
AWS Redshift is a fully managed petabyte-scale data warehouse specially designed for large scarlet data sets and complex queries.
Our infrastructure diagram becomes something like this.
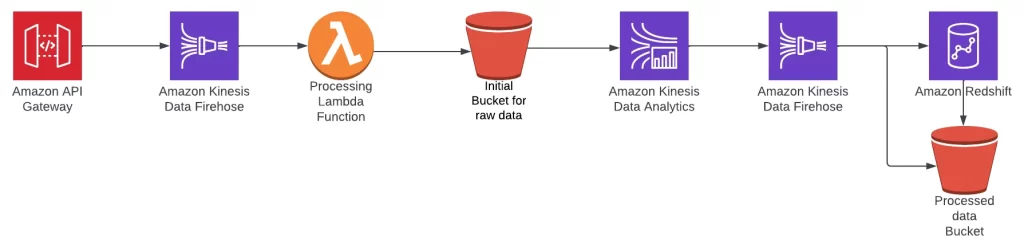
As you can see, the Redshift Cluster is the last step in this data flow. The Kinesis Firehose will use it as a destination to send the data transformed by the Kinesis Data Analytics. The reason for keeping the last S3 bucket (and having an arrow from Redshift) is that the Cluster cannot talk directly to Firehose. Instead, it needs this S3 as an intermediate step and will use a copy command to load the data from S3 into its tables.
On the coding part – (look over the first part to see how we build the code until here).”
On main.tf we introduce a new module called module “kinesis-data-firehouse-after-analytics-redshift” and delete the one called kinesis-data-firehouse-after-analytics.”
This new module is still a kinesis firehose declaration but with some significant differences.
Since the delivery will be into a Redshift cluster, we change the code to showcase that.
 redshift_configuration {
   role_arn           = aws_iam_role.kinesis_firehose_role.arn
   cluster_jdbcurl    = "jdbc:redshift://${var.REDSHIFT_ENDPOINT}/${var.REDSHIFT_DB_NAME}"
   username           =  var.CLUSTER_USERNAME
   password           = var.CLUSTER_PASS
   data_table_name    = var.CLUSTER_TABLE
   copy_options = "CSV"
   s3_backup_mode     = "Disabled"

 }
Here, we use the copy_options = “CSV” – because the data we sent is in CSV format. Therefore, the “copy_options” value will be added to the copy command that Redshift uses to load the data.
We also have the S3 declaration, the bucket where Kinesis will store the data and Reshift will copy it
 s3_configuration {
   role_arn           = aws_iam_role.kinesis_firehose_role.arn
   bucket_arn         = aws_s3_bucket.bucket.arn
   buffer_size        = 5
   buffer_interval    = 60
 }
The last module we introduce is the “redshift-cluster”.
We could deploy the Redshift Cluster into the default VPC, but it is better to create a new one just for it. If the cluster is in a VPC, it must also be accessible with a public IP address. And you need to ensure that the Kinesis Data Firehouse IP has access to the cluster.
Because we need “public access” to the Cluster, we created two public subnets and added an internet gateway and the proper routing tables.
You need to also look over the security group defined here.
resource "aws_security_group" "redshift_security_group" {
 vpc_id = aws_vpc.redshift_vpc.id
 ingress {
   from_port   = 5439
   to_port     = 5439
   protocol    = "tcp"
   cidr_blocks = ["${var.KINESIS_CIDR}"]
 }


  egress {
   from_port        = 0
   to_port          = 0
   protocol         = "-1"
   cidr_blocks      = ["0.0.0.0/0"]
   ipv6_cidr_blocks = ["::/0"]
 }


 tags = {
   Name = "redshift-sg"
 }
}
We have only one rule for ingress that allows on port 5439 (the Redshift port) and from a specific CIDR block. We deployed this in the us-west region; for that region, the Kinesis CIDR block is 13.57.135.192/27. If you deploy this code in other regions, you need to use the proper CIDR, and you can take those from here
https://docs.aws.amazon.com/firehose/latest/dev/controlling-access.html#using-iam-rs
The Actual Redshift Cluster is defined with this code.
resource "aws_redshift_cluster" "data_warehouse_cluster" {
 cluster_identifier = "sg12-redshift-cluster"
 database_name      = var.CLUSTER_DB_NAME
 master_username    = var.CLUSTER_USERNAME
 master_password    = var.CLUSTER_PASS
 node_type          = var.CLUSTER_NODE_TYPE
 cluster_type       = var.CLUSTER_TYPE
 cluster_subnet_group_name     = aws_redshift_subnet_group.redshift_subnet_group.id
 skip_final_snapshot           = true


 vpc_security_group_ids        = ["${aws_security_group.redshift_security_group.id}"]
 publicly_accessible           = true
 iam_roles                     = ["${aws_iam_role.redshift_role.arn}"]
 /*provisioner "local-exec" {
   command = "psql \"postgresql://${self.master_username}:${self.master_password}@${self.endpoint}/${self.database_name}\" -f ./redshift_table.sql"
 }*/
}
Please note that we set “publicly_accessible” and “skip_final_snapshot” to true – this means we will not have a final database backup snapshot when we delete the cluster.
A provisioner “local-exec” declaration will let you run a SQL command which creates a database in the cluster. That works if you have SQL installed on your machine – if not, you will need to run it manually and leave that code commented.
Let’s test our code
Do the “terraform validate,” plan, and apply. After deploying the infrastructure, get the API Gateway endpoint URL for PUT and use it in the data-generator.py file. Then run the script to send data to our pipeline (also start the Kinesis Data Analytics app).
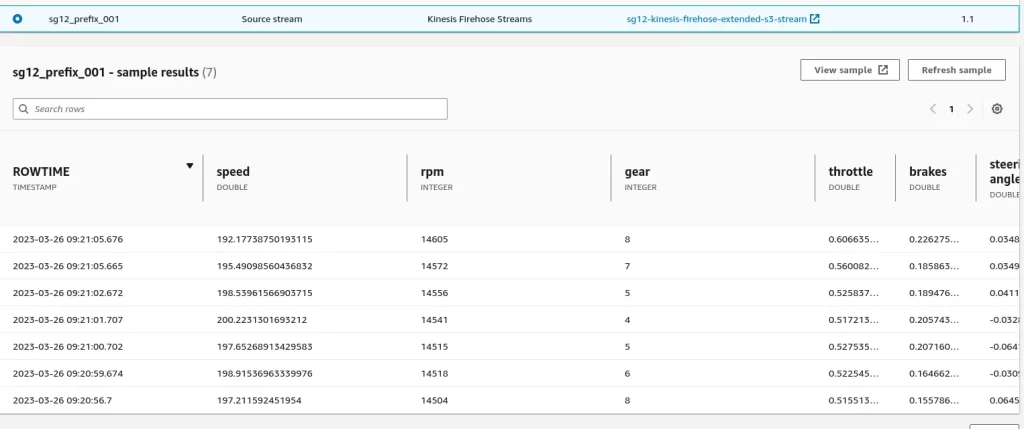
You can follow the data while it travels through this pipeline. For example, you can see how data enters the Kinesis Data Analytics Application.
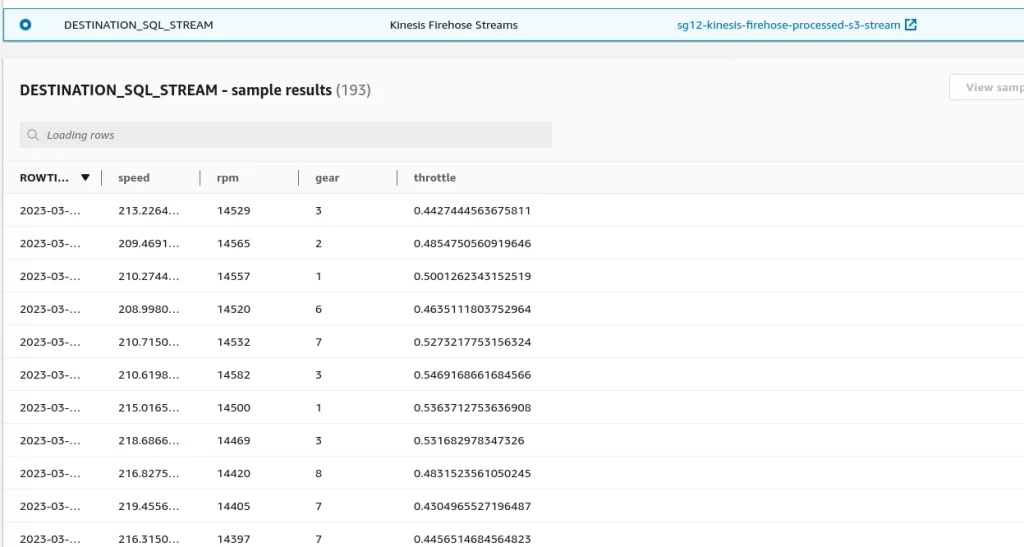
And how it exits
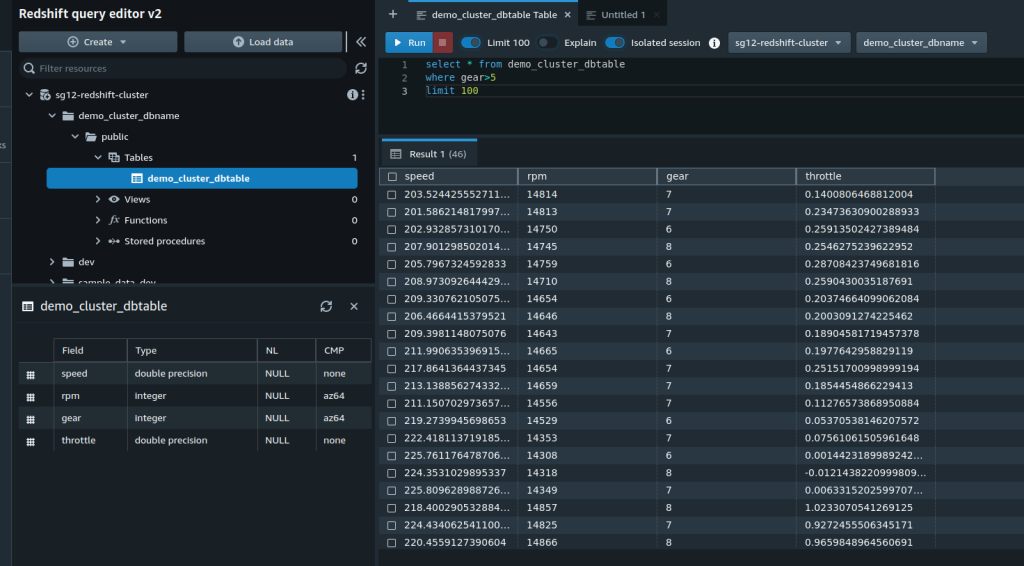
And you can see it in the Redshift Cluster.
Note: If you did not create the table using the provisioner “local-exec” in Terraform, you would need to create the table in Redshift using the SQL command inside the modules/redshift-cluster/redshift_table.sql file.
Now the data has reached the warehouse, the analytics team can step in and work on the data.
You should be aware that since July 2022, we also have the option to replace the Redshift cluster with Redshift serverless. Redshift Cluster is more suitable for workloads that require a high degree of control over the infrastructure. At the same time, Redshift Serverless is more suitable for workloads that require flexibility, scalability, and cost efficiency.