There are situations when you don’t want users to be able to browse your S3 buckets using the S3 URL. Or you can secure that content and restrict access to it. In this case, you may use Cloudfront and force users to use the Cloudfront URL.
Here are some advantages of the Cloudfront – S3 integration :
- You may don’t want your users to know the bucket name.
- Cloudfront will serve the content much faster since the data is geographically distributed. Forcing the users to go only via Cloudfront will improve the loading times of your website or app.
- Data Transfer for content via CloudFront is more cost-effective than when you use S3.
- Cloudfront uses Aws Private Network when distributing, so you can avoid network failures or bottlenecks.
- When you use Cloudfront, you can set up geographic restrict actions, signed URLs, or signed cookies.
- Cloudfront offers additional protection against various exploits. This service is integrated with both AWS WAF and AWS Shield.
To achieve this level of protection, we need to configure Cloudfront to send an authenticated request to S3 and set S3 only to allow access to authenticated calls from Cloudfront.
When deploying such architecture, you start by creating a new Cloudfront distribution. It would be best if you made the S3 bucket before this step.
For “Origin domain,” select your bucket from the dropdown.
To implement this restriction, you must use Cloudfront Origin Acces Control ( CloudFront Origin Access Identity is now obsolete). In the origin access area, select “Origin access control settings” and assign it one of the already created “origin access control policies” ( Or you can create a new one).

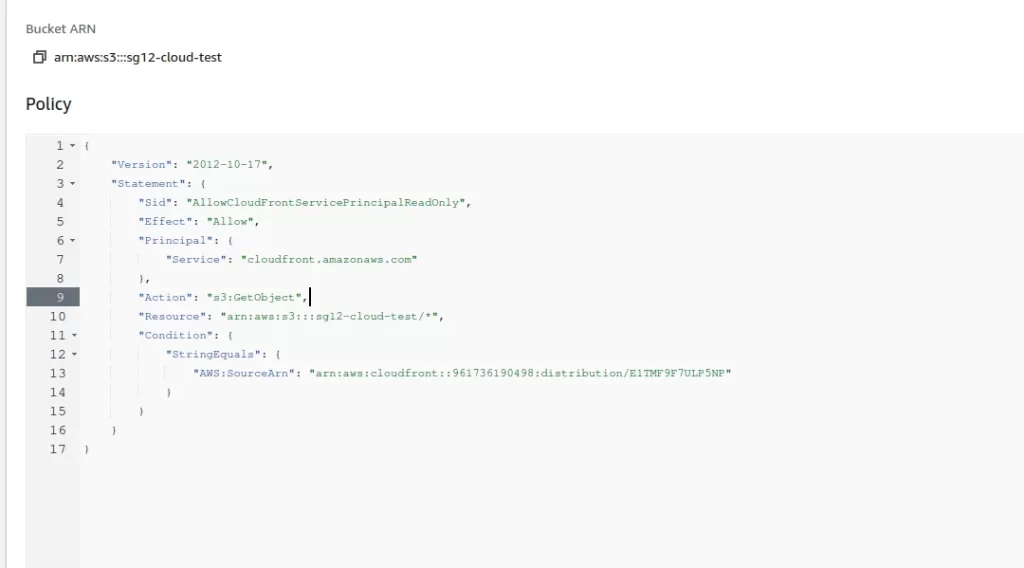
You will also notice a warning message that says you should update the S3 bucket policy after you create this distribution. The S3 bucket policy will be provided after you hit the “Create” button, and it looks like this.
{
        "Version": "2008-10-17",
        "Id": "PolicyForCloudFrontPrivateContent",
        "Statement": [
            {
                "Sid": "AllowCloudFrontServicePrincipal",
                "Effect": "Allow",
                "Principal": {
                    "Service": "cloudfront.amazonaws.com"
                },
                "Action": "s3:GetObject",
                "Resource": "arn:aws:s3:::sg12-cloud-test/*",
                "Condition": {
                    "StringEquals": {
                      "AWS:SourceArn": "arn:aws:cloudfront::961736190498:distribution/E1TMF9F7ULP5NP"
                    }
                }
            }
        ]
      }
In the policy, you can notice that we allow cloudfront.amazonaws.com service to get all objects (read-only access, and please note the * symbol ) in the sg12-cloud-test bucket. The access is permitted ONLY if the source is the distribution we just created.
Once you have done all the steps, you can test and see that you can only access a bucket file using the CloudFront URL, while the S3 URL will fail.
After you create the distribution, you should use your domain rather than the CloudFront default URL (the random numbers and letters). You will need your SSL certificate that will stay in front of Cloudfront distribution, and you will need to import it via ACM (Amazon Certificate Manager).
In this case, edit the distribution and go into settings – you can upload your custom SSL Certificate there.
Make sure to distinguish this from the Load Balancer certificates – you need a separate certificate for the load balancer and a new one for CloudFront.